

Air knife placement after an ultrasonic cleaning tank is not a single distance or angle. The correct position depends on what happens next. A knife between the wash tank and the rinse tank should push cleaning solution back toward the wash stage. A knife after the final rinse should move water toward a drain and prepare the load for final drying.
This difference sounds small, but it changes the mounting direction, collection area, and acceptable mist path. A well-sized air knife in the wrong location can carry chemistry forward, leave hidden water in the basket, or blow droplets onto parts that were already clear. Placement must be designed around the liquid exit path and the way the load moves.
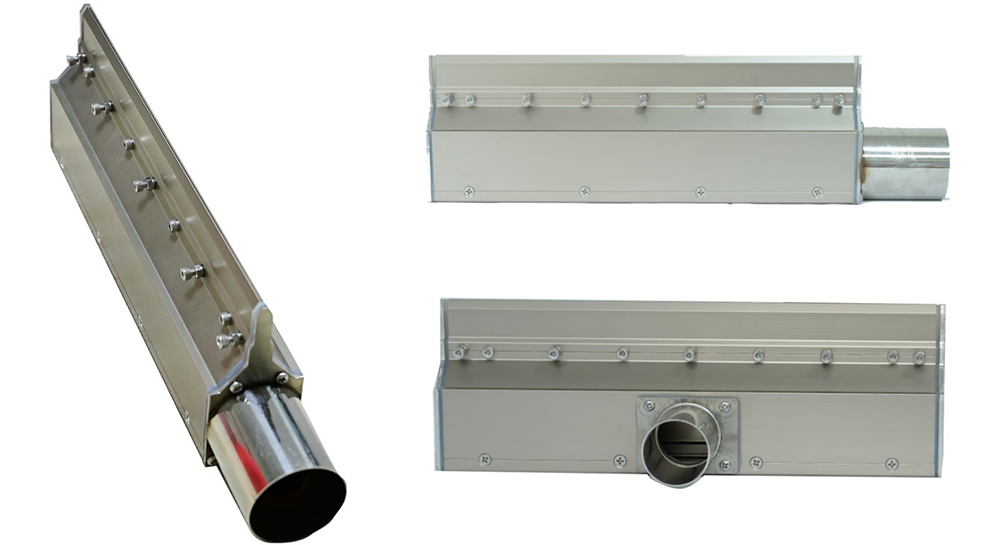
The first objective is drag-out control. Let the basket drain over the wash tank, then angle the air knife so free solution returns to that tank or to a connected drain-back tray. Avoid a forward jet that makes the parts look clear while sending detergent mist into the rinse zone.
The objective is to reduce the liquid load carried into the next rinse. Return water to the rinse stage it came from. This helps protect a cleaner downstream rinse, but the installation still needs mist control. A strong jet without capture can move contamination through the enclosure even when visible droplets leave the part.
Now the objective changes to water removal and drying preparation. The jet can sweep water toward a separate drain, provided it does not blow back into the clean rinse. Final placement should also protect the drying chamber, camera, coating station, or assembly area from mist and delayed dripping.
Treat the Air Knife as an adjustable coordinate, not a fixed accessory. Record the settings so maintenance can reproduce them after cleaning or repair.
Place the knife after a deliberate gravity-drain position. Water that can fall off on its own does not need blower energy. Keep the knife close enough to the tank boundary to prevent liquid from traveling forward on the part or basket, but allow enough open space for runoff to return without striking the next stage.
For many blower-driven QXY applications, 20–50 mm from the air knife to the product is a useful starting range. The dimension must be taken to the nearest point in the full load envelope, not to an empty conveyor. Check the tallest part, basket frame, lifting hook, and normal transfer movement.
A 15°–45° impingement angle is a practical starting range for many drying applications. The jet should drive water toward an open edge or return zone. A steep angle adds local impact but may push liquid into pockets. A shallow angle sweeps across more surface but may pass over recessed features.
The knife does not always need to sit square to the conveyor. A slight diagonal orientation can give water a defined left-to-right route instead of creating a standing wet line. The drain or recovery surface must be placed at the end of that route. Do not direct liquid toward drive components, sensors, or a closed side wall.
Cover the full wet load, including outer basket wires and the farthest part positions. QXY aluminum alloy air knives are factory calibrated for airflow uniformity of ±5% across the knife length. Installed uniformity still depends on duct balance, inlet arrangement, slot condition, and obstructions near the jet.
Ultrasonic cleaning and air-knife drying need the same basic condition: liquid must enter and leave the feature. Manufacturer guidance for ultrasonic cleaning commonly recommends arranging parts so fluid can circulate and drain, with baskets loaded in a single layer where possible. Stacked parts create shadowed cleaning areas and shield the later blow-off.
Blind holes deserve special attention. A hole facing down can trap air during immersion; a hole facing up becomes a cup during lifting. Horizontal orientation often gives the cavity a better chance to fill and drain. Where a part has holes on several planes, no single fixed knife angle will clear every feature. Rotate the fixture, index the basket, or add focused air for the critical cavity.
Include the fixture in the placement study. Hooks, mesh, sleeves, and contact pads retain water and can rewet the load during the next lift.
Keep the basket above the tank for a controlled drain dwell. Side-mounted knives can sweep through the basket while liquid falls back to the tank. If the basket is deep, one knife may clear only the near face. Opposed knives, vertical scanning, or a slow lift through the air sheet can improve coverage. Confirm that the basket frame does not block the jet.
The transfer head may move the basket horizontally after each lift. Place the blow-off inside the station boundary so liquid removal finishes before horizontal travel begins. Guards must move or clear the carrier safely. Flexible ducts need support so repeated motion does not change the knife angle.
Position the knife after the rinse curtain or tank exit and before water can collect on guides. Angle the jet in a direction that helps runoff leave the part. For flat products with two critical faces, upper and lower air knives can work in one pass. Balance both branches and check the lower knife angle carefully.
A standard slot knife handles exposed surfaces well. Recesses, undercuts, and irregular profiles may respond better to a tornado air knife or a combined layout with focused jets. The extra devices should target defined features rather than filling the whole enclosure with turbulent air.
The air knife needs a liquid destination. Use a sloped tray, tank opening, or drain channel below the blow-off zone. Avoid horizontal guards that become secondary drip sources. The enclosure should keep mist from moving into the next tank or condensing in the final dryer.
Blow-off air should be clean, oil-free, and filtered when plant air or ductwork could contaminate the part. Keep blower inlets away from tank vapor and spray. Provide access to inspect the slot, clean buildup, and verify the angle.
Allow for process motion. Baskets swing after lifting. Conveyor parts vary in height. A safe mechanical clearance must cover normal movement, loading error, and maintenance conditions. The ideal aerodynamic stand-off is not acceptable if the knife can be struck by a rack.
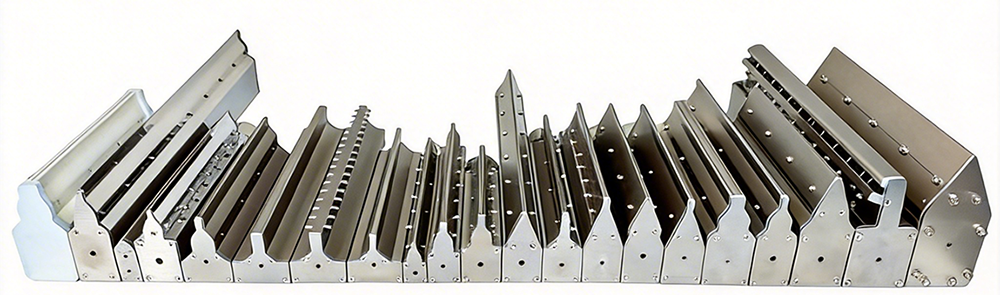
QXY standard aluminum alloy air knife lengths include 150, 300, 450, 600, 800, and 1000 mm, with custom lengths available. Knives longer than 600 mm normally use dual inlets to support airflow distribution. Select length from the actual wet width, including basket edges, rather than the nominal part drawing alone.
Standard slot gaps are commonly 0.5–2 mm, and blower-driven systems typically operate around 2–6 psi (0.14–0.42 bar). A narrower gap can change exit velocity and flow demand, but it does not correct a poor water path. The QXY slot is set at the factory; any adjustment should be checked across the full length and matched to the blower.
Aluminum alloy suits a general dry-off zone with low chemical exposure. Stainless steel or PVC may be more suitable near wash and rinse chemistry, depending on temperature and composition. Material selection covers the knife body, shim, fasteners, and nearby hardware, not only the visible blade.
Mark the initial X and Z positions, pitch, yaw, slot setting, blower condition, basket orientation, drain dwell, and transfer speed. Run the most difficult approved load, not an open demonstration basket. Apply a repeatable dryness or carryover check at the critical surfaces.
• Inspect the near side, center, far side, basket frame, and lowest part position.
• Tilt the load after blow-off to reveal water held in cavities or contact points.
• Check the next tank, enclosure wall, and dryer entrance for mist and delayed drips.
• Repeat at cold startup and normal operating temperature.
• Confirm clearance during lifting, indexing, basket swing, and abnormal stop recovery.
Adjust one coordinate at a time. If a wet band crosses the full load, review knife angle, slot, and supply. If only one part family fails, orientation or a sheltered feature is more likely. If the surface clears but the next stage becomes wet, the collection and mist path need attention.
A knife mounted too far away invites a pressure increase; too close, it may hit the basket or atomize water. A jet aimed at a closed pocket only spreads liquid. A flat drain tray becomes a second reservoir. These are placement faults, not necessarily blower faults.
Fixed air knives work best with repeatable load presentation. For changing baskets, use dedicated fixtures, selectable positions, scanning motion, or targeted manual air for exceptional loads. One fixed setting cannot reach surfaces it cannot see.
QXY Machinery (Shenzhen Qixingyuan Machinery Equipment Co., Ltd.) is a high-tech enterprise integrating R&D, design, production, and sales. Based in Shenzhen, China, the company specializes in industrial drying, dust removal, and water-blowing solutions and has more than 10 years of focused air knife experience.
The QXY product catalog lists aluminum alloy air knives for ultrasonic cleaning-machine drying sections, hardware and automotive-parts cleaning, and other continuous industrial applications. Relevant options include standard slot air knives, stainless steel and PVC designs, tornado air knives, small-hole air knives, and dual-sided arrangements.
QXY Machinery can provide custom length, slot width, hole pattern, and inlet configurations. A useful placement review includes tank sequence, chemistry, basket and part drawings, load envelope, transfer motion, drain-back space, conveyor or lift speed, air source, and the required dry or carryover endpoint.
→ Contact QXY Machinery to discuss air knife placement after your ultrasonic cleaning tanks.
Q: How far should an air knife be from parts after ultrasonic cleaning?
A: For many blower-driven applications, 20–50 mm is a practical starting range. Measure to the nearest point in the moving load envelope and verify water removal on the actual basket and part.
Q: What angle should the air knife use?
A: A 15°–45° angle from the surface is a useful starting range. Aim the jet toward an open edge, source-tank return, or final drain. The correct angle depends on part geometry and the required liquid path.
Q: Should the air knife point back toward the ultrasonic tank?
A: Yes, when the knife is controlling drag-out after that tank. After the final rinse, direct water toward the designated drying drain without blowing it back into the clean rinse.
Q: How can blind holes be dried with a fixed air knife?
A: Orient holes so they can fill and drain, often closer to horizontal than straight up or down. Add a second angle, basket rotation, indexing, or focused air where one fixed sheet cannot reach the cavity.
Q: Is one air knife enough for a deep ultrasonic basket?
A: Not always. The near face and basket frame can shield deeper parts. Opposed knives, a controlled lift through the air sheet, scanning motion, or a more open load pattern may be needed.
Q: What air quality is needed after ultrasonic cleaning?
A: Use clean, oil-free, filtered air where supply contamination could redeposit on the part. Keep blower inlets away from tank vapor, mist, and dirty enclosure air.
Q: How can I tell whether placement or airflow is the problem?
A: Map wet areas by load position and part feature. A full-width wet band points toward supply or angle; one sheltered cavity points toward orientation; water in the next stage points toward drainage or mist control.
Need a custom air knife solution? Send us your application details, material requirement ,or air source type . Our engineering team will help you select the right model.

Shenzhen Qixingyuan Machinery Equipment Co., Ltd.
info@airknifecn.com
Building 8, Wanfeng Third Industrial Zone, Xinqiao Street, Bao'an District, Shenzhen, Guangdong, China


