

Flat surfaces are the easy case for Air Knife drying. The air curtain hits the surface, breaks the water film, and pushes liquid toward an edge or drain. Uneven, ribbed, or recessed products behave differently. Water hides behind ribs, sits in grooves, stays inside holes, or returns from a pocket after the main face already looks dry.
When this happens, adding more air is not always the right fix. More pressure may create mist, splash-back, product movement, or noise while the recessed area remains wet. The real problem is often airflow access. The air must reach the part of the surface where water is trapped.
Improving drying on difficult surfaces usually requires a mix of setup changes and product-specific design. Angle, distance, drain direction, line speed, product orientation, and air knife type all matter.
An air knife does not remove water by magic. It transfers momentum from a high-speed air sheet into liquid on the surface. On a flat product, the air can sweep the liquid away in one direction. On an uneven product, the air may hit a raised rib first and lose force before it reaches the groove behind it.
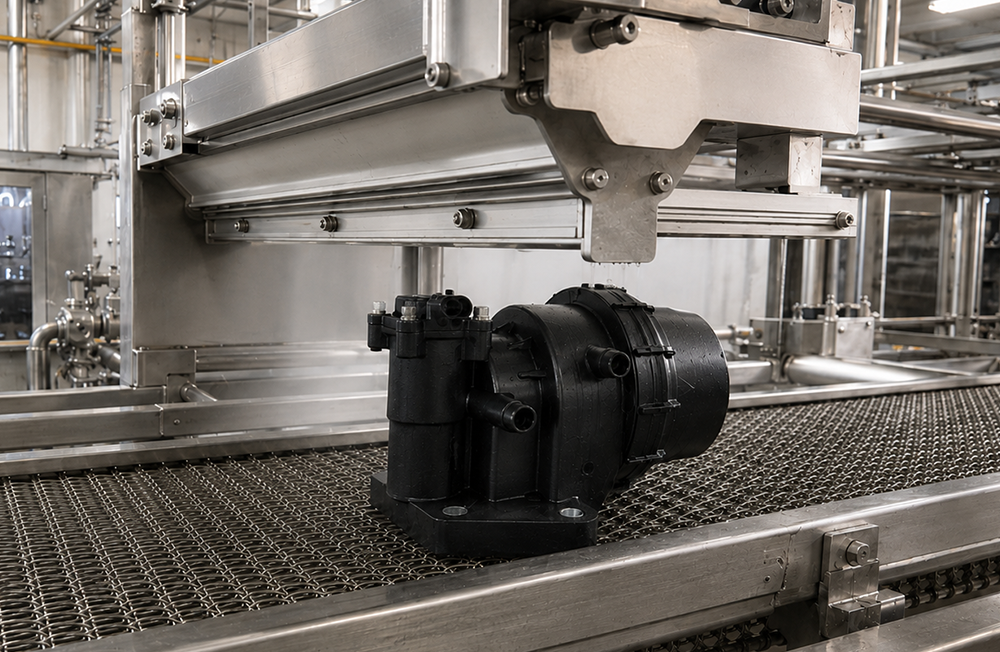
The common problems are simple:
· Airflow shadow: a rib, edge, wall, fixture, or raised feature blocks the air path.
· Water pocketing: liquid settles in a groove, hole, corner, or recessed channel.
· Re-wetting: water leaves one area and runs back into another area downstream.
· Short exposure time: line speed is too high for the trapped water to move out.
· Wrong direction: the air pushes water deeper into the recess instead of out of it.
Before changing hardware, mark the wet area after the air knife. Do not only check whether the product is dry or wet. Check exactly where the water remains.
Look for repeatable patterns. If every product stays wet behind the same rib, the issue is geometry. If wet spots move randomly across a flat surface, the issue may be airflow balance, slot damage, filter loading, or line speed. If the product is dry at the knife but wet later, water may be draining back from a pocket or condensing from the surrounding air.
Useful inspection points include the leading edge, trailing edge, underside, groove bottom, rib shadow, recessed corner, through-hole, cap shoulder, molded pocket, fixture contact area, and any place where liquid can sit below the main surface.
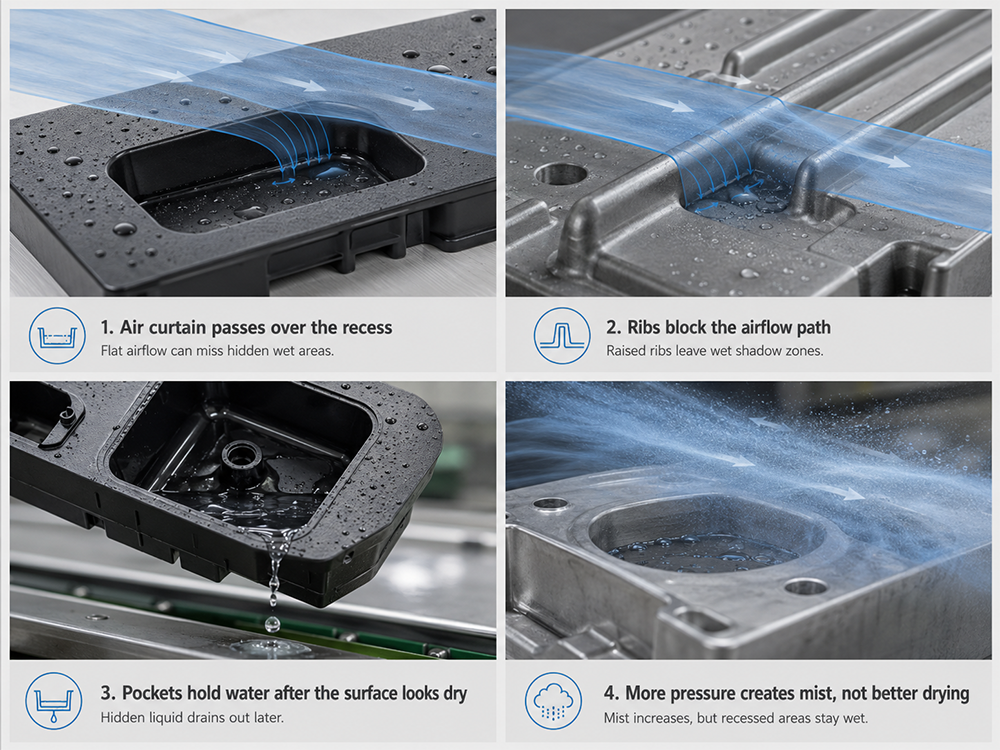
Problem 1: The air curtain passes over the recess
Sometimes the top surface looks dry, but water is still left in a groove, pocket, cap shoulder, molded channel, or recessed label area. This usually happens because a straight air knife makes a flat sheet of air. If the recess is blocked by a wall or edge, the air may pass over the opening instead of going into the wet area. In this case, the first thing to adjust is the angle. The air should enter the recess and give the water a clear path to leave. If the shape is deep or irregular, a tornado air knife or a small secondary knife aimed at the recess may work better.
Problem 2: Ribs block the airflow path
Raised ribs can stop the air from reaching the whole surface. One side may dry, but water stays behind the rib or comes back after the product leaves the drying zone. The rib works like a small wall. The air hits the exposed face first, then loses force behind the raised feature. A cross-angle setup can help. Two-stage drying is also useful. The first knife removes the main water, and the second knife targets the rib shadow or trailing edge. In some cases, air from the opposite side is the better solution.
Problem 3: Pockets hold water after the main surface is dry
A product may look dry at the drying station, but water can drain out later and wet the next process. This often means the pocket is holding liquid below the main surface. The air knife has removed the visible water, but it has not emptied the pocket. The product may need to be tilted so the water can drain. It may also need more drain time before final blow-off, a slower line speed, or a local air stream aimed into the pocket. For cylindrical products, a ring air knife may be more suitable than a straight blade.
Problem 4: More pressure creates mist but not better drying
If the line becomes louder and mistier but water still stays in the recessed feature, pressure is probably not the main issue. More force can break exposed water into droplets, but it still may not reach the hidden surface. The real problem is often the air path. Go back to the product shape and setup first. Check the distance, angle, and product orientation before increasing pressure. For many QXY drying applications, 20-50 mm distance and 15-45 degrees can be used as practical starting points.
A standard straight air knife is still the right choice for many flat and open surfaces. It gives stable linear coverage and is easy to size. But difficult geometry may need another approach.
Consider a tornado air knife when the product has complex 3D surfaces, product edges, fixture shadows, or recessed areas where rotating airflow can enter from changing directions. Consider a small hole air knife for PCB through-hole drying, where a normal slot knife cannot push air through holes effectively. Consider a Ring air knife for cables, tubes, pipes, bottles, and round products that need 360-degree coverage. Consider an air-to-air configuration when both sides of a flat product need drying at the same time.
The best design may also combine types. A straight air knife can remove most surface water, while a second local knife handles the difficult feature. This often works better than forcing one oversized air knife to solve every problem.
Use this checklist before replacing the air knife.
1. Mark the exact wet area after the current drying station.
2. Check whether the water is trapped by ribs, recesses, holes, edges, or fixtures.
3. Review whether the product can be tilted, rotated, or given more drain time before blow-off.
4. Check distance. For many QXY applications, 20-50 mm is a practical starting range.
5. Check angle. A 15-45 degree impingement angle often gives better shearing than direct impact.
6. Check whether water has a clear path to leave the product and machine area.
7. Check slot condition, inlet balance, filter condition, and blower capacity.
8. Test staged drying before increasing pressure. More air is not always better.
QXY Product Spec Box: Drying Uneven, Ribbed, and Recessed Surfaces
Option / Setting | When It Helps |
Standard straight air knife | Best for open flat faces, wide surfaces, and predictable linear blow-off when ribs or recesses are not the main problem. |
Tornado air knife | Rotating/turbulent airflow for complex 3D surfaces, recessed areas, product edges, and fixture cleaning. |
Small hole air knife | PCB-focused design with dual-row 1 mm holes for through-hole drying where standard slots cannot reach. |
Ring air knife | 360-degree coverage for tubes, cables, pipes, extrusions, bottles, and cylindrical products. |
Air-to-air knife | Upper and lower opposed knives for simultaneous two-sided drying of flat products. |
Setup references | 20-50 mm working distance, 15-45 degree impingement angle, and 0.5-2 mm standard slot range for many drying duties. |
About QXY Machinery
QXY Machinery (Shenzhen Qixingyuan Machinery Equipment Co., Ltd.) is a high-tech enterprise integrating R&D, design, production, and sales, specializing in drying, dust removal, and water-blowing solutions for industrial applications. With over 10 years of focused expertise in the air knife field, QXY Machinery has developed a mature technical foundation and a complete in-house R&D system.
QXY Machinery produces over 15 standard air knife types, including aluminum alloy, stainless steel 304/316, PVC, titanium alloy, small hole PCB air knives, ring air knives, tornado air knives, and air-to-air configurations. For uneven, ribbed, or recessed products, QXY can help compare straight, tornado, ring, small hole, and staged air knife layouts before specification.
Based in Shenzhen, China, QXY Machinery supports standard lengths from 150 mm to 1000 mm and custom lengths up to 6 m. The company also supports custom hole patterns, custom slot widths, inlet layout adjustments, and material selection for PCB, LCD glass, food processing, beverage, pharmaceutical, printing, textile, and hardware production lines.
→ Contact QXY Machinery to review air knife drying for uneven, ribbed, or recessed product surfaces.
Q: Why do ribbed products stay wet after air knife drying?
A: Ribs can block the air path and create shadow zones. The exposed surface dries, but water remains behind the raised feature or drains back downstream.
Q: Can I fix recessed surface drying by increasing pressure?
A: Sometimes, but not always. More pressure may create mist or splash without reaching the recess. Angle, distance, product orientation, and drainage path should be checked first.
Q: What air knife angle works better for recessed areas?
A: A shearing angle that directs air into the wet feature and gives water a path out usually works better than straight-down impact. For many drying jobs, 15-45 degrees is a practical reference range.
Q: When should I use a tornado air knife?
A: Use a tornado air knife when the product has complex 3D surfaces, recessed areas, edges, or fixture shadows where a straight air curtain cannot reach well.
Q: What is the best air knife for PCB holes?
A: A small hole air knife is often better for PCB through-hole drying. QXY's PCB-specific design uses dual-row 1 mm holes to send focused air into areas a standard slot knife may miss.
Q: Can one air knife dry both the main surface and recesses?
A: Sometimes. If the geometry is mild, one well-angled knife may work. If water remains in hidden areas, a staged layout or second local knife is often more stable.
Q: What information should I send QXY Machinery?
A: Send product photos, wet-area photos after drying, line speed, product dimensions, recess depth, rib direction, liquid type, air source, available space, and current air knife setup.
Need a custom air knife solution? Send us your application details, material requirement ,or air source type . Our engineering team will help you select the right model.

Shenzhen Qixingyuan Machinery Equipment Co., LTD.
info@airknifecn.com
Building 8, Wanfeng Third Industrial Zone, Xinqiao Street, Bao'an District, Shenzhen, Guangdong, China


